PTV xServer internet with different frontend architectures
-
If you plan to build a client application with xServer internet, you should consider the different architecture styles for this kind of applications:
-
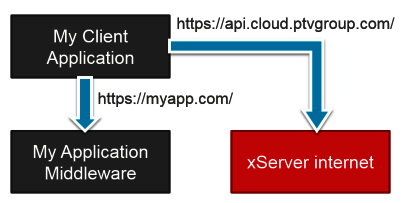
Direct Access to xServer internet
Direct access this the easiest and most flexible way to access xServer internet. Most samples for in this developer guide access xServer internet directly from the JavaScript or C# client. However direct access may raise some problems:
The clients need access to the internet. This may not be the case for some enterprise environments.
It requires CORS. While xServer internet fully supports CORS (=Cross Origin Resource Sharing), the requirement for CORS may cause problems with some browsers or firewalls.
The xServer internet token is exposed to the client. While the xServer internet token cannot be used to login to the customer center, you may want to prohibit the sniffing of the token.
-

-
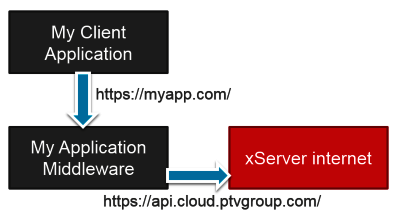
xServer internet Access through a Middleware Proxy
A technique to handle the problems for direct access is to "proxy" the xServer requests through your application middleware. Because all request are using the same origin then, you won't get any problems with CORS. Another benefit is that you can use your own authentication and inject the token for xServer internet in your middleware. So the client cannot get hold of the token.
-

-
1. Use ASP.NET as Proxy
For ASP.NET, you can add a generic xServer-handler to inject your token. See here
for a reference implementation.
-
2. Use Apache as proxy
- Download the latest stable release of Apache. A list of download locations of precompiled version for windows can be found at https://httpd.apache.org/docs/current/platform/windows.html#down (I used the Apache Lounge).
- Please check the readme provided with the package for details on default deployment
- Edit the <apache>/conf/httpd.conf
- (optional) Edit the Listen parameter if you want Apache to run on a different port then the default 80 (might already be in use by another program). (around line 58)
- Enable the LoadModule directives for the following modules:
i. headers_module (arround line 118)
ii. proxy_module (around line 140)
iii. proxy_html_module (around line 148)
iv. proxy_http_module (around line 149)
v. ssl_module (around line 171)
vi. xml2enc_module (around line 180)
- Enable Include conf/extra/httpd-vhosts.conf (around line 505)
- Edit the <apache>/conf/extra/httpd-vhosts.conf, set up your virtual host like below. You can use https://www.base64encode.org/ to create the needed base64 encoded strings.
- Run the apache by executing the <apache>/bin/httpd.exe
- (optional) You can apache as a windows service so it starts automatically with windows. See http://httpd.apache.org/docs/2.4/platform/windows.html#winsvc for details.
<VirtualHost *:80>
    # enable SSL/TLS Protocol Engine for proxy
    SSLProxyEngine On

    <Location /xmap>
        # The text after "Basic " is "xtok:XXXXXXXX-XXXX-XXXX-XXXX-XXXXXXXXXXXX" base64-encoded
        RequestHeader set Authorization "Basic eHXXXXXXXXXXXXXXXXXXXXXXXXXXXXXXXXXXXXXXXXXXXXXXXXXXXjQ="

        ProxyPass https://api-eu.cloud.ptvgroup.com/xmap
        ProxyPassReverse https://api-eu.cloud.ptvgroup.com/xmap
    </Location>

    <Location /WMS>
        # your xerver internet token
        RequestHeader set xtok "XXXXXXXX-XXXX-XXXX-XXXX-XXXXXXXXXXXX"

        ProxyPass https://api-eu.cloud.ptvgroup.com/WMS
        ProxyPassReverse https://api-eu.cloud.ptvgroup.com/WMS
    </Location>

    <Location /xlocate>
        # The text after "Basic " is "xtok:XXXXXXXX-XXXX-XXXX-XXXX-XXXXXXXXXXXX" base64-encoded
        RequestHeader set Authorization "Basic eHXXXXXXXXXXXXXXXXXXXXXXXXXXXXXXXXXXXXXXXXXXXXXXXXXXXjQ="

        ProxyPass https://api-eu.cloud.ptvgroup.com/xlocate
        ProxyPassReverse https://api-eu.cloud.ptvgroup.com/xlocate
    </Location>
-
- Run the apache by executing the <apache>/bin/httpd.exe
- (optional) You can apache as a windows service so it starts automatically with windows. See http://httpd.apache.org/docs/2.4/platform/windows.html#winsvc for details.